(For the Korean version, click here)
Introduction: Why Should We Manage Hostnames?
When you first access a cloud instance like AWS Lightsail via terminal (SSH), you often see a prompt like bitnami@ip-172-26-xx-xx. This default setting uses an arbitrary internal IP as the hostname. While it works, there are several critical reasons why experienced engineers change it immediately:
- Preventing Human Error: As your infrastructure grows, it becomes difficult to distinguish between Production (Prod), Staging, and Development (Dev) environments. Clear hostnames prevent you from accidentally running dangerous commands in the wrong environment.
- Management Efficiency: A well-named hostname tells you exactly what the server’s role is (e.g.,
web-server,db-master) at a single glance. - Network Identification: It makes it much easier to identify and manage servers within a local network or VPN.
- Security and Readability (Documentation): For engineers who document their work or write technical blogs, exposing internal IPs in screenshots is a security risk. Changing the hostname eliminates the need to blur or censor your terminal prompt every time you take a screenshot.
Today, we will cover how to professionally manage and change hostnames in a Linux environment.
Checking Current Hostname Information
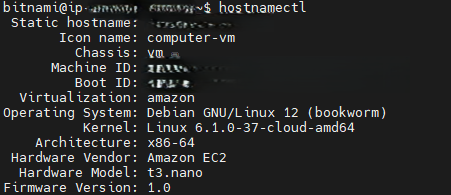
Before making any changes, check the detailed hostname information using the following command:
Bash
hostnamectlThis provides not only the static hostname but also the kernel version and architecture, which is helpful for understanding your overall system environment.
Changing the Hostname (hostnamectl set-hostname)
The standard way to change the hostname in modern Linux distributions is using the hostnamectl command. This updates the /etc/hostname file automatically.
Bash
# Change to your desired name (e.g., hwanfra-blog)
sudo hostnamectl set-hostname hwanfra-blog- Tip: It is standard practice to use lowercase letters and hyphens (
-) for hostnames to ensure compatibility and readability.

Updating the Hosts File (Crucial Step)
Simply changing the hostname isn’t enough. You must register the new name in the /etc/hosts file to avoid “unable to resolve host” errors and to ensure that system services can identify the server locally.
Bash
sudo vi /etc/hostsUpdate or add your new hostname next to 127.0.0.1 at the top of the file:
127.0.0.1 localhost hwanfra-blog

Applying and Verifying Changes
To see the changes reflected in your terminal prompt immediately, you can restart your session or run:
exec bashYour prompt will now show bitnami@hwanfra-blog, providing a much cleaner and more professional look for both management and documentation.

💡 Engineer’s Note: Persistence in Cloud Environments
In certain cloud environments, the cloud-init service may reset the hostname to its default IP-based name upon reboot. To prevent this and make your changes permanent:
- Open the config file:
sudo vi /etc/cloud/cloud.cfg - Find the line
preserve_hostname: falseand change it totrue.preserve_hostname: true

Conclusion
A clear hostname is a basic but powerful safety mechanism in server management. It reduces the risk of administrative errors and makes your technical documentation much more efficient. I highly recommend setting a consistent naming convention for all your servers from the start.