(For the Korean version, click here)
Creating is easy. However, true expertise is revealed during ‘deletion.’
In virtualization or cloud environments, you often encounter a “Busy” or “Cannot be removed” message when trying to delete a volume. This happens because the OS still recognizes and is actively using that volume.
A truly ‘clean deletion’ doesn’t just start with clicking a button on the cloud console; it starts with safely disconnecting the connection from within the VM. You must unmount the file system and tear down the LVM structure in the correct order to ensure the physical (or virtual) disk removal goes smoothly without any side effects. Here is the standard procedure for LVM deletion to ensure you handle the cleanup like a pro.
1. Start with ‘fstab’ Cleanup and Unmounting (The Essential Step)
This is the most critical stage. If you skip this and forcibly detach the volume from the console, you may encounter system errors or, worse, your server might fall into Emergency Mode during the next reboot.
# 1. Check the current mount status
df -h

# 2. Unmount the volume in use
umount /data

# 3. Verify that the connection is severed
df -h

# 4. Remove the fstab entry (Crucial for successful booting)
vi /etc/fstab
# Find the line related to /data and either delete it or comment it out by adding '#' at the beginning.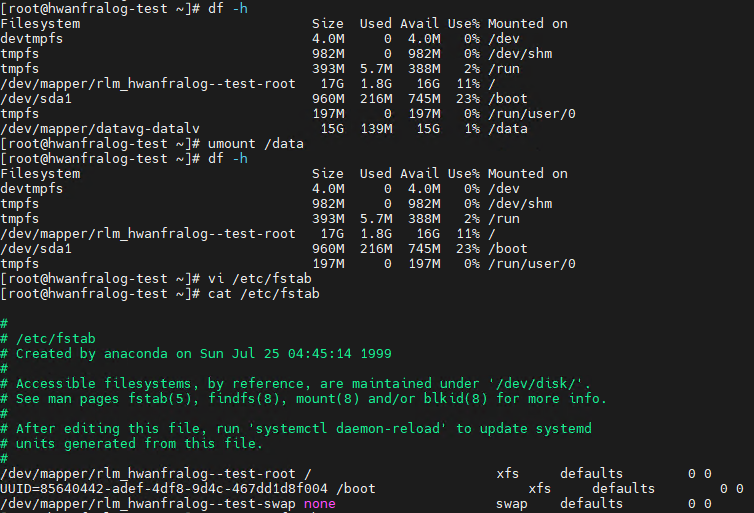
2. Reverse LVM Deletion: Reverse the Creation Order (LV → VG → PV)
LVM has a layered structure, so you must remove it in the reverse order of how it was built. Check the status using lvs, vgs, and pvs, and remove them one by one.
① Remove LV (Logical Volume)
lvremove /dev/datavg/datalv

# Verification: Check if 'datalv' has disappeared from the list
lvs
② Remove VG (Volume Group)
Remove the volume group to release the pooled space.
vgremove datavg

# Verification
vgs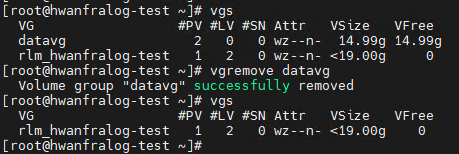
③ Release PV (Physical Volume)
Remove the physical partition from the LVM membership.
pvremove /dev/sdb1

# Verification: No LVM components should remain
pvs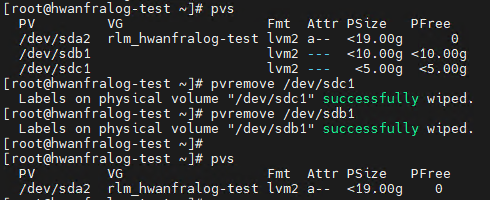
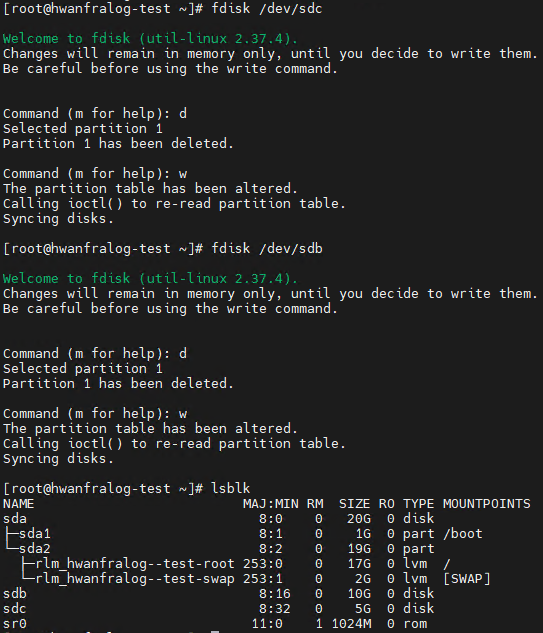
3. Final Cleanup: Delete the Partition via fdisk
Even though the LVM structure is gone, the disk (sdb) still retains LVM partition information. You must clear this to make it a completely “empty disk.”
fdisk /dev/sdbInput Sequence:
d: Delete partitionw: Write changes and exit
Now, if you run lsblk and see no partitions listed under /dev/sdb, you are finally ready to physically detach (remove) the volume from the console.
💡 Engineer’s Perspective
“No matter how powerful a cloud console or hypervisor is, it cannot perfectly solve what’s happening inside the OS. Forcing a detachment while the OS is still holding onto the volume will eventually lead to file system corruption or system-wide instability. ‘OS cleanup before infrastructure removal’—this simple habit is the first step in preventing major outages.”