(For the Korean version, click here)
Now that we’ve got Rocky Linux running from our last post, let’s give it some more breathing room. We’re going to add a new hard drive and set up a proper storage area.
You might ask, “Why not just use a simple partition?” Honestly, in a real production environment, LVM (Logical Volume Manager) is the only way to go. It’s a total lifesaver when a disk gets full at 2 AM—you can just expand the space on the fly without shutting everything down.
Let’s walk through how to set this up from scratch and mount it to /data.
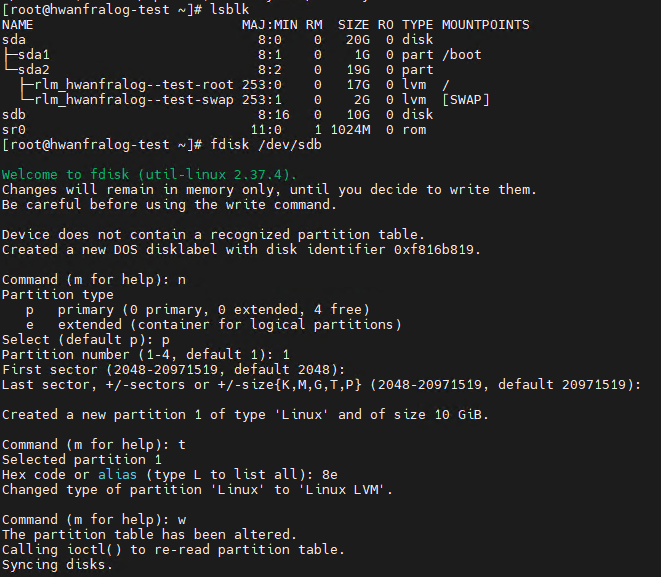
1. Prepping the Disk (fdisk)
First, we need to tell the system that our new disk (in this case, /dev/sdb) is meant for LVM.
# See if your new disk is detected
lsblk

# Start the partitioning
fdisk /dev/sdb
The “Magic” Key Sequence:
- n : Create a new partition.
- p : Make it a Primary partition.
- 1 : Partition number 1.
- Enter twice : Use all the space (default settings).
- t : The most important part—change the type.
- 8e : This is the hex code for Linux LVM.
- w : Save your changes and exit.
2. The LVM Workflow: PV → VG → LV
LVM works in layers. A good habit I picked up is to check the status after every single command using pvs, vgs, and lvs. It’s much easier to catch a mistake early this way.
① Create the PV (Physical Volume)
This initializes the raw partition so LVM can actually use it.
pvcreate /dev/sdb1

# Check if it's registered
pvs
② Create the VG (Volume Group)
Think of this as a big virtual pool. I’ll name mine datavg.
vgcreate datavg /dev/sdb1

# Check the pool status
vgs
③ Create the LV (Logical Volume)
Now, we slice out the actual volume we’ll use. I’m taking 100% of the pool for datalv.
lvcreate -l 100%FREE -n datalv datavg

# Final check
lvs
3. Formatting and Mounting
The structure is ready, but we still need to format it. I’m using XFS because it’s fast and handles large files beautifully.
Bash
# Format as XFS
mkfs.xfs /dev/datavg/datalv

# Create the folder and mount it
mkdir -p /data
mount /dev/datavg/datalv /data

# Verify the size
df -h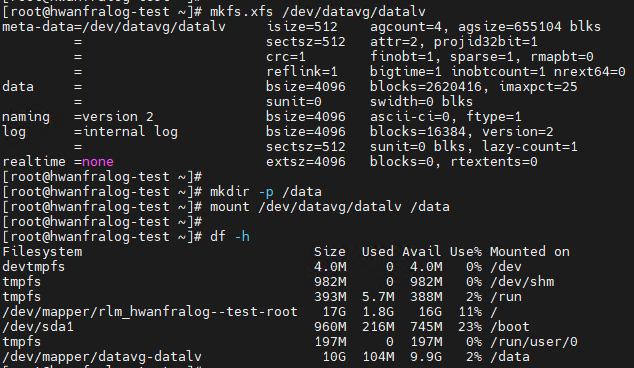
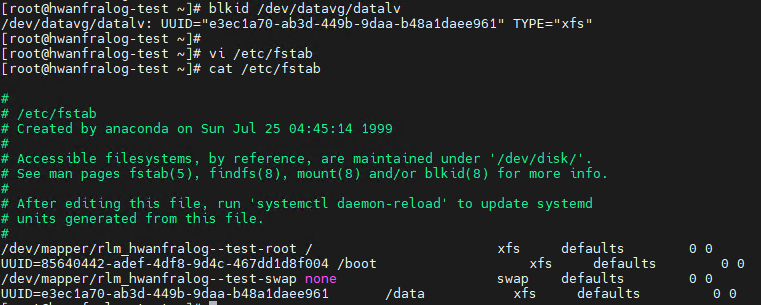
4. Making it Permanent (/etc/fstab)
If you skip this, your drive won’t show up after a reboot. Don’t use the device name; use the UUID. It’s the professional way to ensure the system finds the right disk every time, even if the device order changes.
Bash
# Grab your UUID
blkid /dev/datavg/datalv
Open /etc/fstab with vi and add this at the bottom (make sure to replace the UUID with your own):
Plaintext
# [UUID from above]                        [Path]  [Type] [Options]   [Dump/Pass]
UUID=xxxxxx-xxxxxxx-xxxxx-xxxxxxxxxxxxxx  /data   xfs    defaults    0 0
💡 My Take
“Checking your work with
pvs,vgs, andlvsmight feel like extra work, but trust me, it’s a total lifesaver in complex environments. If you ever want to see the ‘nitty-gritty’ details, try thedisplaycommands likepvdisplay.”
🚀 Wrapping Up
Your /data area is now live and fully flexible. If you ever need more space, you can just plug in another drive and expand it with vgextend and lvextend.
But knowing how to build is only half the job. You also need to know how to tear it down safely. In [Linux Basics #7], I’ll show you how to delete LVM volumes without trashing your system. Stay tuned!